Содержание
Components that I used in my clone are shown as bold.
- The protection diode D2, BAT85 will drop much more voltage on Vdd. So if you wish to avoid the voltage drop you can short it. If you don’t want to completely eliminate the protection you can replace BAT85 with lower drop Schottky diode. Thus you can replace it with 1N5819 or 1N5818.
- You can replace the MOSFET Q3 (IRF9Z34) with cheaper BC640, in this case the output current will be limited to few hundred milliamperes with an acceptable voltage drop. You can also replace IRF9Z34 with IRF9540N if it is not available in your city.
- Inductor L1 can vary between 470uH – 1mH and should atleast 150mA rated.
- BS170 can be substituted by VN2010L or BS107
- BS250 can be substituted by VP2020L or BSS92 (be careful, BSS92 has different pinout!) or BC 557 with base resistor 1K
- You can omit the 330nF capacitor. I used .1mF capacitor.
Components that I used in my clone is shown as bold.
ICSP to ZIF Converter
A switch is provided with ICSP to ZIF converter. 1 and 2 should be connected for programming of 28 and 40 pin ICs. 2 and 3 should be connected for the programming of 18,14 and 8 pin ICs. AUX connection is not shown in this circuit diagram but it is included in the PCB design. In the standard ICSP, you don’t require AUX.
You can download the PCB design and Component layout from the bottom of this article. Both PCBs are single sided, some straight wires can be found on component side. There is a text on both PCB’s, thus you can easily find out the right side. Before etching please double check that you can read the text in it.
It is better to check the PCB for continuity and shorts after etching. Unfortunately to start the PICKit2 you need to program the firmware to PIC18F2550, you need an another programmer for this. If you haven’t one, we well provide programmed 18F2550 or Kits or even Programmer at cheap rates, just contact us. Once you made this programmer you can upgrade the firmware without the help of other programmers, since the firmware also includes the bootloader. The latest version of firmware is available at Microchip’s Website.
Before connecting to the computer, please double check the board against unwanted shorts and open circuits. In Windows 7 , the PICKit2 will be detected as USB Input Device. Then install and open the handling software ‘PICKit2’ and check the status reported by it. It should show ‘PICKit2 is connected’ and shouldn’t be in red background. It all right, go through troubleshooting wizard by clicking Tools>> Troubleshoot. You need a voltmeter for this.
If you have any errors or doubts please comment, we will solve it…..
Download
You can download the Softwares and Latest version of hex file from Microchip’s Website. You can download the Hex file, Schematics, PCB Design, Component Layout etc from here…
PICKit2
PICkit 2 Introduction:
There are many PIC programmer available, commercial and DIY devices. As Microchip introduces the new microprocessors the programming software got to be updated accordingly playing catch-up with the PIC manufacturer. That is the root of the problem with third-party PIC programmers. Microchip’s PICkit 2 is the low cost ICSP programmer for Flash PICs with USB interface introduced by Microchip. Only subset of PIC microcontrollers is supported, but the list is including all the recent devices from PIC16, PIC18 and PIC24 families and certainly covers all the PICs you are most likely want to use. It is fully integrated with Microchip’s MPLAB IDE and allow not only program but debug applications as well. As alternative you can use the standalone programmer applet, see picture below.
ICSP Pinout
The pin-out for Microchip standard 6-pin connector for In-Circuit Serial Programming (ICSP) is listed in table below:
| Pin | Function |
| 1 | _MCLR/Vpp (programming voltage) |
| 2 | Vcc(+5V) |
| 3 | GND |
| 4 | Data |
| 5 | Clock |
| 6 | LVP (low-voltage programming mode control) |
Отладочные платы
В комплект поставки программатора PICKit2 может входить несколько вариантов отладочных плат. На сегодняшний день доступны следующие варианты:
- DM164120-1 Low Pin Count Demo Board. Плата предназначена для разработки устройств на микроконтроллерах с количеством выводов 8,14,20.
- DM164120-2 44-Pin Demo Board. Плата содержит микроконтроллер PIC16F887. Также имеется макетное поле для компонентов поверхностного монтажа.
- DM164120-3 28-Pin Demo Board. Плата содержит микроконтроллер PIC16F8860. Микроконтроллер и макетное поле для штыревого монтажа.
- DM164120-4 18-Pin Demo Board. Плата содержит микроконтроллер PIC16F1827. По своей структуре напоминает DM164120-1.
- DM164120-4 PIC18 J-Series 64/80-Pin Demo Board. Самая серьезная отладочная плата из данной серии содержит микроконтроллер PIC18F87J10.
Также, программатор PICKit2 может быть использован и с другими устройствами, как производства Microchip, так и сторонних разработчиков, например PIC-MT-USB или Amicus.
Компактный программатор PICKit2 и его отладочные платы.
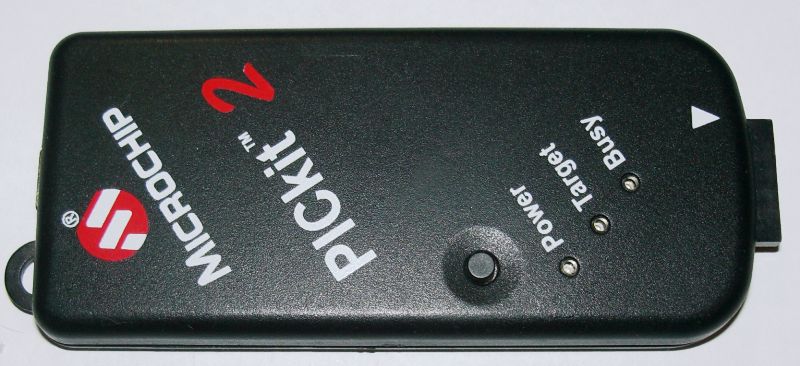
В линейке Microchip имеется несколько устройств, предназначенных для программирования микроконтроллеров PIC. Отличаются они по своим возможностям и цене. Самым доступным считается программатор PICKit2. Благодаря низкой стоимости и значительным функциональным возможностям, этот устройство стало очень популярным в среде радиолюбителей. О популярности PICKit2 можно судить по многочисленным клонам, количество которых приближается к таковым от более серьезного программатора ICD. Также в сети существует несколько сайтов, посвященных этой разработке Microchip.
Описание PICKit2
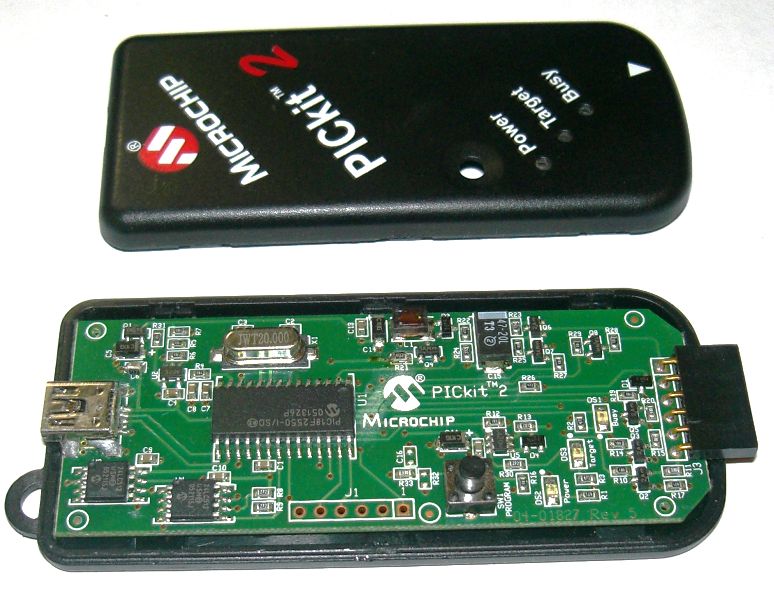
PICKit2, а сейчас и новая версия PICKit3, представляют собой компактный внутрисхемный программатор, поддерживающий большинство микроконтроллеров, выпускаемых Microchip. Для некоторых кристаллов доступно не только программирование , но и внутрисхемная отладка проектов. С компьютером, программаторы серии PICKit, связываются посредством стандартного USB интерфейса. Это в значительной мере
повышает привлекательность устройств, так как не требует решать проблему отсутствия COM-порта, как это было для многих старых моделей. Связь с целевым устройством осуществляется посредством шестиконтактного разъема с шагом 2.54мм. При необходимости, программатор может играть роль источника питания для устройства, работая от шины питания USB.
Так как PICKit2 разработан в Microchip, его поддержка включена в фирменную IDE под названием MPLAB. Имеется также внешняя оболочка, с помощью которой можно прошивать файлы, подготовленные в иных системах разработки.
Pickit ii Parts List
The DIY PICkit 2 part list for the two the most popular electronic components vendors, Mouser and DigiKey is shown below.
| Part | Description | Mouser # | DigiKey # |
| J1 | USB type B connector | 737-USB-B-S-RA | 609-1039-ND |
| IC1 | PIC18F2550 | 579-PIC18F2550-I/SP | PIC18F2550-I/SP-ND |
| IC2 | MCP601P | 579-MCP601IP | MCP601-I/P-ND |
| Q1,Q4,Q6 | BS250P | 522-BS250P | BS250P-ND |
| Q2,Q3,Q5,Q7 | 2N7000 | 512-2N7000D26Z | 2N7000FS-ND |
| D1,D2 | BAT85 | 78-BAT85S | 568-1617-1-ND |
| D3 | Green 5mm LED | 604-WP7113SGD | 754-1263-ND |
| D4 | Yellow 5mm LED | 604-WP7113YD | 754-1284-ND |
| D5 | Red 5mm LED | 604-WP7113ID | 754-1264-ND |
| X1 | Crystal, 20.000Mhz | 815-ABL-20-B2 | XC1723-ND |
| R1,R3,R4 | 10K Ohm | 291-10K-RC | 10KQBK-ND |
| R6,R10,R13 | 10K Ohm | 291-10K-RC | 10KQBK-ND |
| R2,R7,R8 | 470 Ohm | 291-470-RC | 470QBK-ND |
| R5,R14 | 100 Ohm | 291-100-RC | 100QBK-ND |
| R9,R12 | 2.7K Ohm | 291-2.7K-RC | 2.7KQBK-ND |
| R11,R16 | 4.7K Ohm | 291-4.7K-RC | 4.7KQBK-ND |
| R15 | 1K Ohm | 291-1K-RC | 1.0KQBK-ND |
| R17,R18,R19 | 33 Ohm | 291-33-RC | 33QBK-ND |
| C1,C4,C7,C10,C11 | 0.1uF | 871-B32529C104K189 | 495-2532-ND |
| C2,C3 | 22pF | 140-50N2-220J-RC | 490-4175-ND |
| C5,C8 | 10uF | 647-UVR1V100MDD1TA | 493-1036-ND |
| C6 | 0.47uF | 871-B32529C474J | 495-2560-3-ND |
| C9 | 47uF 16V | 647-UVR1C470MDD1TD | 493-1039-ND |
| L1 | 680uH | 652-RLB0608-681KL | 811-2051-ND |
| S1 | Pushbutton | 506-FSM4JH | 450-1665-ND |
Setting Unit ID
The programmer can be assigned a Unit ID to identify it uniquely. After the fresh firmware programming the device applet is always showing the funny ID
“ID= OIHoss”. It could be reset to not-assigned or set to any value by selecting “Tools>Calibrate VDD & Set Unit ID” menu, see picture below.
Calibration
Calibration allows greater the VDD voltage accuracy. Note that as the calibration is dependent on the USB voltage and moving the PICkit 2 unit to a different USB port, to or from a USB hub or to another computer port may invalidate the calibration. To calibrate the PICkit 2 unit, a digital multi-meter is required. Disconnect the PICkit 2 unit from the target and select “Tools>Calibrate VDD & Set Unit ID”. to bring up the calibration wizard. Follow the steps in the wizard to complete the calibration process.
Troubleshooting DIY PICkit2 assembly
You can use “Tools->Troubleshoot” menu to help with resolving connectivity from the PICkit 2 to the target device. This is also useful where there are the device assembling errors, as providing step-by-step output validation process.
Pickit 2 Schematic / Circuit Diagram:
DIY Guide to Build PICkit 2
PICkit 2 was originally built by Microchip as open design programmer with the schematic, source code and firmware available to boost the popularity of the PIC devices. Because of that it is easy to build a clone version of the original device. Most of the clones will produce unregulated 5 volt VPP where the original Microchip PICkit 2 provides adjustable VPP output to allow 3.3 and 2.5 volt parts programming. The schematic I have used is based on the original PICkit 2 without programmer-to-go functionality. That functionality allowing a hex file to be downloaded to the PICkit 2 to later program PIC microcontrollers without a PC with a simple pressing programmer’s push button. I do not think that functionality is required for a hobbyist but allows simplify the schematic by omitting two 24C512 EEPROM chips.
PICkit 2 Programmer Software
The PICkit 2 has USB bootloader and capable of updating the programmer firmware directly from Microchip web site. Every time the PICkit 2 programmer application is launched, it will check the firmware version of the PICkit 2 to see if it is the latest version. If not, it will attempt to automatically download the latest version. The software upgrades are free and Microchip updates them in timely fashion. Even more, the firmware and schematic are freely available. Apparently Microchip has made the open design intentionally, see it as the way to boost using the popularity PIC microprocessors. With such simplicity of design it is easy to build a clone version. The Sure Electronics is making a good clone and it comes with ICSP cables, see the Products page. My first PIC programmer was Melabs EPIC device with parallel port interface. After upgrading my PC I have realized that parallel port became legacy these days, as the most of new PC motherboards do not have it all. The another annoying part about Melabs programmers in general is that even if you buy the full package (hardware + software) upgrades are not free and only beta stuff available for download. I have successfully burned all my PIC18 and PIC24 chips using PICkit 2 and would definitely recommend it. PICkit 2 v2.61
Отладочная плата DM164120-1
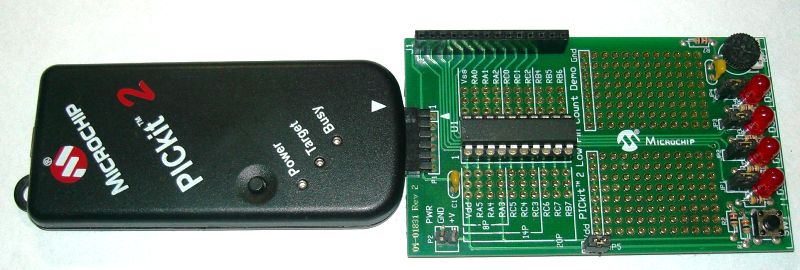
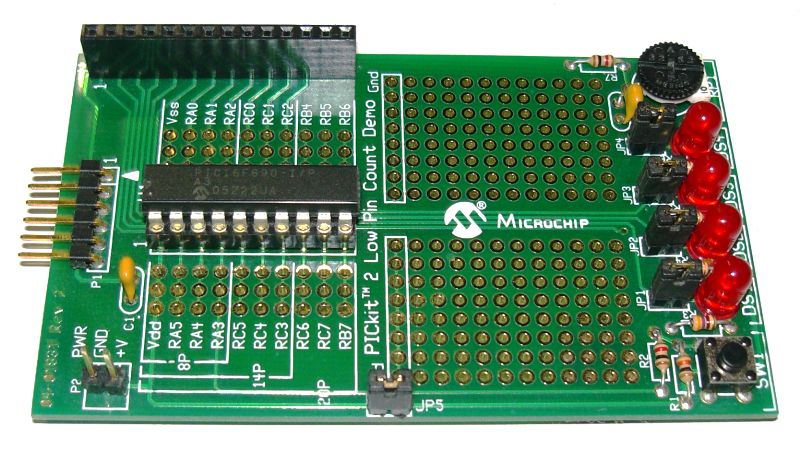
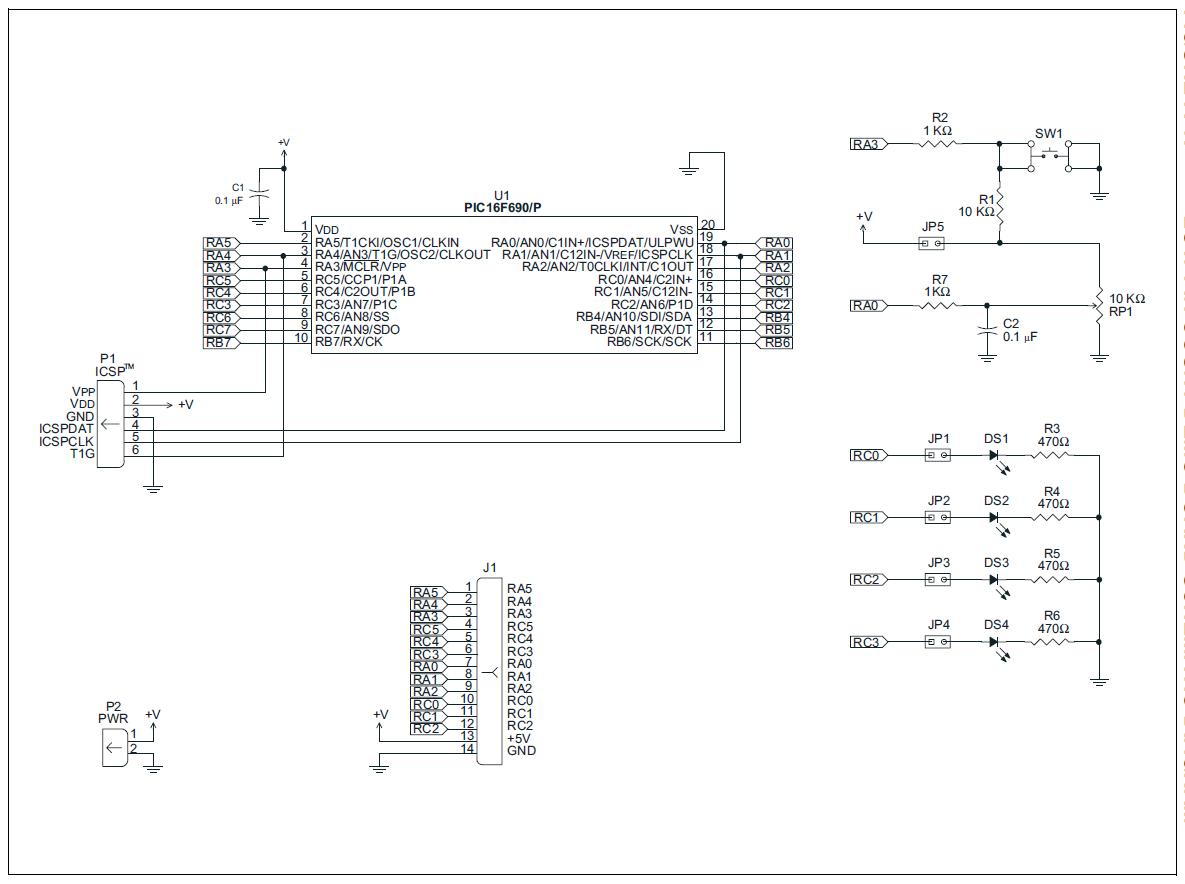
Данная плата стала самой первым, и самым простым устройством, используемым совместно с PICKit2. Плата предназначена для работы с микроконтроллерами в корпусе DIP8, DIP14, DIP20. В комплект поставки входит микроконтроллер PIC16F690.
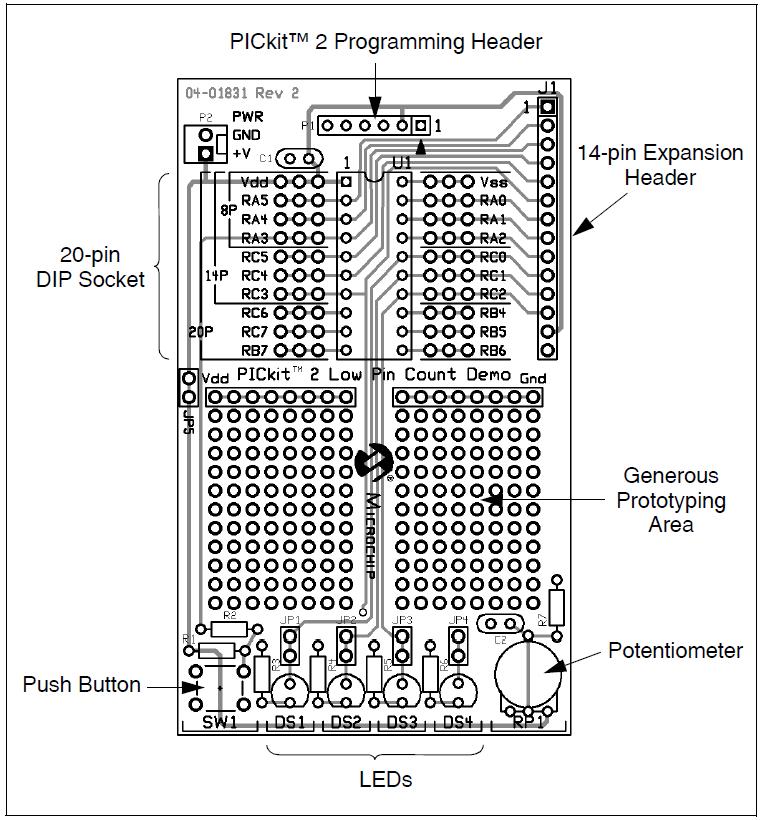
На плате установлены следующие устройства:
- Панелька для целевых микроконтроллеров
- PLD разъем, на который выведены все вывода микроконтроллера в корпусе DIP14.
- Разъем программатора
- Разъем внешнего питания с перемычкой выбора
- Пользовательская кнопка
- 4 светодиода с перемычками подключения к МК
- Потенциометр
- Макетное поле
Все вывода любого микроконтроллера разведены в виде отверстий на плате. Это позволяет создавать самые разнообразные устройства. Макетное поле выполнено в виде отдельных отверстий, которые никак не соединены между собой, за исключением шин питания. Это конечно повышает универсальность, но значительно увеличивает трудоемкость монтажа.
Отладочные платы, при некотором изменении и необходимом позиционировании, могли бы стать отличной альтернативой таким крупным проектам как Arduino. К сожалению, их возможность практического применения оставляет желать лучшего, а самый удачный вариант использования — изучение возможностей микроконтроллеров PIC и макетирование несложных устройств.
 |
 |
 |
В настоящее время на смену PICKit2 пришла новая модель PICKit3. Ее сердцем стал микроконтроллер серии PIC24. Основным достоинством PICKit3 считается полная поддержка новых. 32-разрядных микроконтроллеров PIC32. Поэтому, несмотря на то, что PICKit2 еще можно найти в продаже, он уже фактически стал историей. Тем не менее вторая версия еще послужит, так как младшие семейства Microchip она шьет без проблем.
You have no rights to post comments


